
When your air conditioning system fails during a Louisiana summer, the thought of a full AC replacement can feel overwhelming. But understanding what the installation process actually involves—from the initial in-home assessment to the final startup commissioning—helps you make informed decisions and set realistic expectations for your home. This guide walks you through every step of a professional AC installation, so you know exactly what to expect when you call Doug’s Service Company.
Why a Professional AC Installation Matters
Installing a new air conditioning system is not a DIY project. It requires proper sizing, correct refrigerant handling, electrical work, and strict compliance with local building codes. A poorly installed system runs inefficiently, fails prematurely, and may void your manufacturer warranty. Doug’s technicians hold the proper licenses and certifications to handle Electrical, Mechanical, and Natural Gas installations—credentials that matter when your comfort and investment depend on it.
A professional installation also ensures your system is sized correctly for your home. An AC unit that’s too small runs constantly without ever reaching your target temperature. One that’s too large short-cycles—turning on and off too frequently—which fails to properly dehumidify your home and wastes energy. The right installer takes measurements, checks insulation levels, accounts for sun exposure, and calculates the correct cooling capacity in tons for your specific space.
In South Louisiana, the stakes are even higher. High humidity and extreme summer heat mean an improperly installed system won’t just be inefficient—it will struggle to keep your family comfortable from May through September.
When Should You Replace Your AC System?
Not every cooling problem requires a full replacement. Understanding when to replace versus repair is one of the most important conversations to have with your HVAC technician. Most air conditioning systems have a lifespan of 15 to 20 years with proper maintenance. In humid climates like Terrebonne and Lafourche Parish, systems that haven’t been well-maintained may begin declining sooner.
Signs that ac replacement is the right call include:
- Frequent repairs — If you’re calling for repairs multiple times per season, the cumulative cost often exceeds a new system within a few years.
- Rising energy bills — Older systems lose efficiency over time, especially as components wear. If your bills keep climbing without any change in usage habits, the system may be to blame.
- Inconsistent cooling — Hot and cold spots, rooms that never cool down, or a unit that runs all day without reaching your set temperature are all warning signs.
- R-22 refrigerant — Systems using R-22 (Freon) are outdated and increasingly expensive to service, as the refrigerant is no longer manufactured.
- Age over 15 years — A system approaching or past 15 years is a strong candidate for replacement, especially heading into a South Louisiana summer.
If your current unit is under 15 years old and the repair cost is less than half the price of a replacement, repair is often the smarter short-term choice. Learn more about our AC repair services for freezing coils, refrigerant leaks, compressor noise, and other common issues.
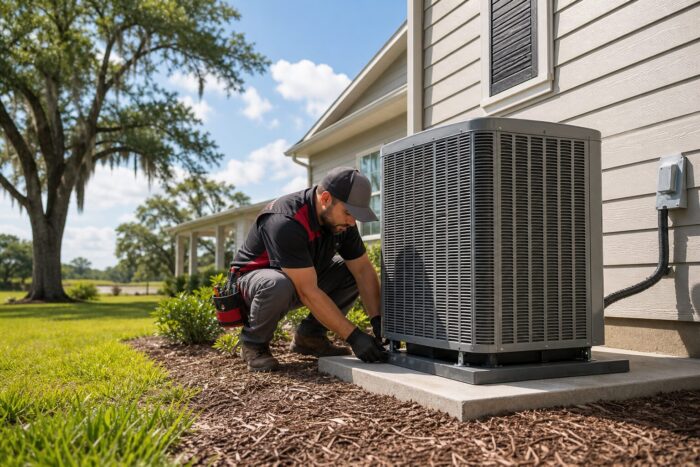
Step 1: In-Home Assessment and Load Calculation
Before any equipment is ordered or scheduled, a Doug’s technician visits your home to conduct a thorough assessment. This is not a quick walkthrough—it’s a detailed evaluation that determines the right system for your specific home.
During the assessment, the technician will inspect your existing ductwork for leaks, damage, or undersizing, measure room dimensions and calculate your home’s overall square footage, evaluate insulation levels in your attic and walls, note window placement, sun exposure, and ceiling heights, and review your current energy usage to understand how your home performs. In areas like Houma, Thibodaux, and throughout Lafourche Parish—where humidity and heat are relentless—accurate sizing is the difference between a system that keeps up and one that never does.
This step also produces a Manual J load calculation, the industry standard method for determining the correct cooling capacity. Skipping this step and “sizing by the old system” is one of the most common mistakes made by less thorough HVAC contractors, and it’s a mistake that costs homeowners money every month for years.
If your ducts are damaged or undersized, the technician may recommend duct sealing or duct cleaning as part of the installation. Sealed ducts improve system efficiency by 15 to 20 percent, directly reducing your monthly energy bills.
Step 2: Equipment Selection and SEER2 Ratings
Once sizing is complete, your technician walks you through equipment options that match your home’s needs and your budget. Modern systems vary significantly in efficiency ratings, features, and price—and understanding those differences helps you make a smarter long-term investment.
SEER2 ratings (Seasonal Energy Efficiency Ratio) measure how efficiently a system cools. Higher SEER2 systems cost more upfront but deliver lower monthly utility bills—a meaningful consideration in South Louisiana where air conditioners run eight or more months a year. The minimum standard for new systems sold in the South is 15 SEER2.
In some homes—particularly additions, sunrooms, or rooms without existing ductwork—a ductless mini-split system may be the best solution. These systems deliver targeted cooling without requiring ductwork and are increasingly popular for converted spaces.
Doug’s offers flexible financing to make upgrades accessible. Systems start as low as $136 per month, making it easier to move from an aging, inefficient unit without a large upfront cash outlay. Your technician will help you find the right balance between upfront cost and long-term energy savings.
Step 3: Scheduling and Pre-Installation Preparation
Once you’ve selected your system, installation is scheduled at a time that works for your household. Most standard AC installations are completed in one to two days. Jobs that require ductwork modifications or electrical panel upgrades may take longer.
Before the crew arrives, clear the area around your outdoor condenser and indoor air handler, remove obstacles from hallways or access areas, secure pets away from the work areas, and plan to be available at the start and end of the job for the walkthrough.
Your technician will need access to your electrical panel and any areas where refrigerant lines run, including attics, crawlspaces, or utility rooms.
Step 4: Removal of the Old AC System
On installation day, the crew begins by safely disconnecting and removing your existing system. If your current unit still contains refrigerant, it must be recovered using specialized EPA-certified recovery equipment before any disconnection takes place. Venting refrigerant into the atmosphere is illegal under federal EPA regulations and every Doug’s technician holds individual EPA certification.
Once the refrigerant is properly recovered, electrical wiring is disconnected and capped, and the old condenser and indoor evaporator coil are carefully removed and hauled away. The area is then cleaned and prepared for the new equipment.
The existing disconnect box and electrical whip (the flexible conduit connecting power to the outdoor unit) are also replaced at this stage. These components age alongside your system and are standard replacements for a complete, code-compliant installation.
Step 5: Preparing the Installation Area
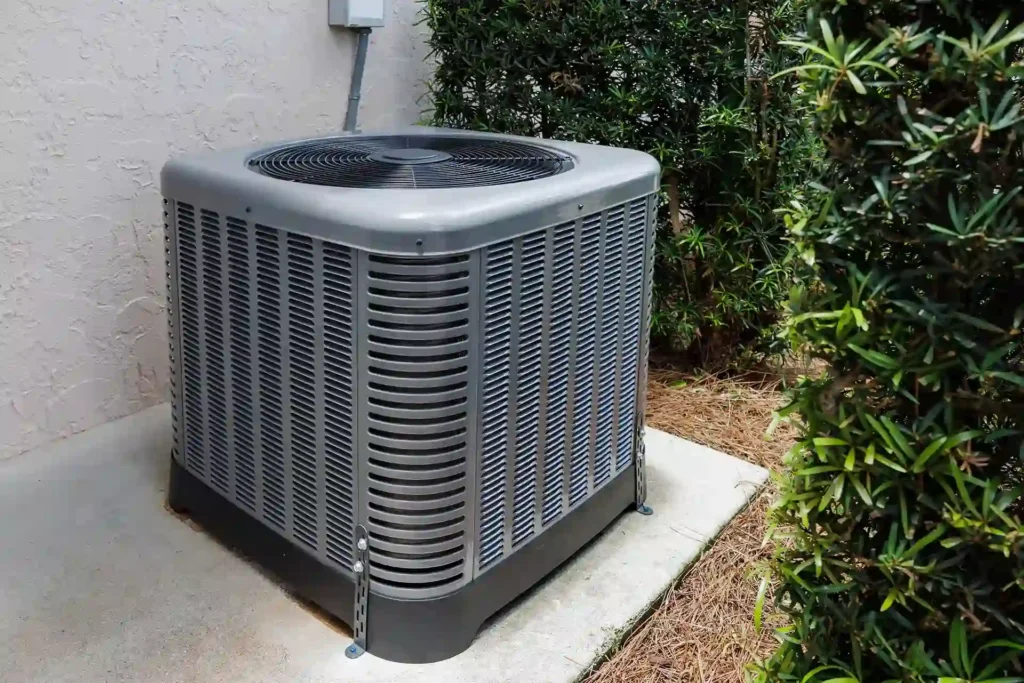
Before the new equipment is set in place, the installation area needs to be properly prepared. For the outdoor condenser, this means leveling the ground and installing a new composite pad. Modern air conditioners are larger than their predecessors, so the existing pad often needs to be replaced or repositioned.
Composite pads are the preferred choice over concrete. Concrete can crack and shift over time, making future leveling difficult. A composite pad is designed to withstand outdoor conditions for the full life of the unit and does a better job absorbing vibration, which reduces noise.
Indoors, the plenum and ductwork connections around the evaporator coil location are inspected and any necessary modifications are made before the new coil is installed. This prep work prevents the need to revisit connections after the new equipment is in place.
Step 6: Installing the New Indoor Evaporator Coil
The indoor evaporator coil is the half of your air conditioning system that sits inside your home—typically above or below your air handler or furnace. This is where warm air from your home passes over refrigerant-cooled coils, releasing its heat before the cooled air is distributed through your ductwork.
The new evaporator coil is positioned and connected to your existing ductwork system, with all joints properly sealed to prevent air leaks. The condensate drain pan and drain line connections are also verified at this stage to ensure proper drainage of the moisture removed from your home’s air.
In South Louisiana’s humid climate, proper condensate drainage is especially important. A coil that drains slowly or improperly will contribute to moisture buildup, mold growth, and reduced indoor air quality.
Step 7: Running New Copper Refrigerant Lines
The refrigerant line set—a pair of copper lines that carry refrigerant between the indoor coil and the outdoor condenser—is typically replaced during a full system installation. Reusing old lines is only acceptable under specific conditions, and even then requires thorough flushing and pressure testing.
New refrigerant oil formulations used in modern systems are not compatible with the oil residue left in older copper lines. Mixing the two can damage the new system’s compressor. A fresh line set eliminates this risk entirely.
The new lines are routed from the outdoor unit to the indoor coil with as few bends as possible and are secured every four to six feet to prevent movement. All penetrations through walls or floors are sealed to prevent air leaks and pest entry.
Step 8: Setting the New Outdoor Condenser Unit
The new outdoor condenser is carefully positioned on the prepared pad and secured in place. The technician verifies the unit is perfectly level—an unlevel condenser leads to operational problems and accelerated wear on internal components.
The refrigerant lines are then connected to the service valves on the condenser using a process called brazing. Brazing involves heating the copper connections to over 1,200 degrees Fahrenheit and flowing a silver alloy filler rod into the joint to create a permanent, leak-free connection. During brazing, dry nitrogen is purged through the lines to prevent oxidation inside the copper tubing—a step that protects the internal components of your new system for its entire service life.
After brazing, a filter dryer is installed in the liquid line to absorb any residual moisture and contaminants from the refrigerant circuit. This small component plays an outsized role in protecting your compressor from damage caused by moisture or debris in the system.
Step 9: Electrical Connections and Disconnect Box
A licensed electrician—Doug’s holds Electrical License #CL73874—makes all high-voltage and low-voltage electrical connections and verifies that your home’s panel can safely handle the new system’s electrical load. If an upgrade is needed, it is completed at this stage.
The new service disconnect box is mounted securely to the exterior of your home, adjacent to the outdoor condenser. This box allows the power supply to the AC unit to be safely cut without requiring a trip to the main electrical panel—a requirement under state and local safety codes.
Low-voltage control wiring connects your thermostat to both the indoor air handler and the outdoor condenser, allowing the system to cycle on and off based on your temperature settings. All connections are made per the National Electrical Code (NEC) and the manufacturer’s specifications.
If your new system includes a gas heating stage and requires natural gas connections, Doug’s Master Natural Gas Installer (#LMNGF13126) handles those connections as well, with all lines pressure-tested for leaks before proceeding.
Step 10: Installing the Condensate Drain Line
As your air conditioner removes humidity from your home’s air, it produces condensation—sometimes several gallons of water per day during a South Louisiana summer. The condensate drain line carries that water away from the evaporator coil to an appropriate drain, typically a floor drain or exterior drainage point.
A proper condensate drain installation includes a trap to prevent air bypass, an overflow safety switch wired to shut down the system if the primary drain becomes blocked, and a secondary drain connection as a backup. The drain line is sloped correctly for gravity drainage and secured to prevent sagging.
Condensate drainage issues are one of the most common causes of water damage in homes with central air conditioning. Getting this step right during installation prevents expensive problems down the road.
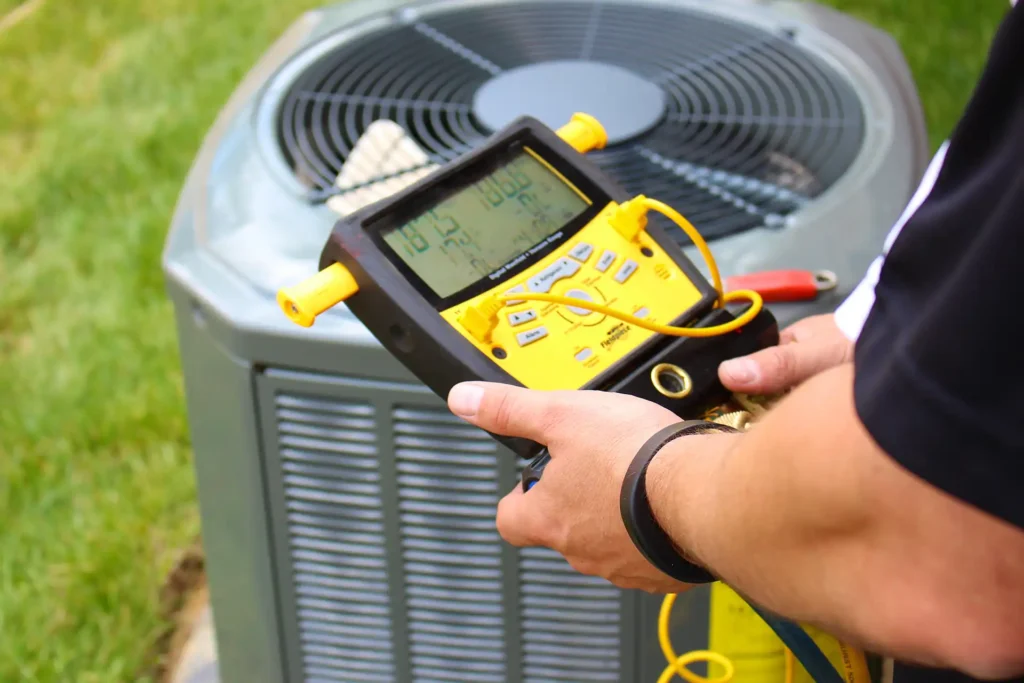
Step 11: System Evacuation and Refrigerant Charging
Before refrigerant is introduced, the entire system—including the line set, evaporator coil, and condenser—must be evacuated using a vacuum pump. This process removes all air, nitrogen, and moisture from the refrigerant circuit. Moisture is particularly damaging: it reacts with refrigerant oil to form acids that corrode internal components and cause premature system failure.
The system must reach and hold a vacuum of 500 microns or lower. This step also serves as the final leak test—a system with any leak will not hold vacuum. The evacuation process typically takes 30 minutes to over an hour depending on the line set length and coil size.
Once a successful vacuum is confirmed and held, the service valves are opened and refrigerant is charged into the system. The technician adds or adjusts refrigerant to match the system’s precise specifications—too little reduces cooling capacity, too much strains the compressor and shortens its lifespan.
Step 12: Startup Commissioning and Performance Verification
With all connections complete, the system is powered on and allowed to run for 15 to 20 minutes before commissioning begins. For an accurate startup reading, the home needs to have a sufficient cooling load—a warm indoor temperature above 75°F is recommended so the system is running at full capacity during measurement.
During commissioning, Doug’s technicians record a comprehensive set of performance data including suction and liquid line pressures and temperatures, superheat and subcooling measurements, supply and return air temperatures, blower motor and compressor amperage, total static pressure readings, and refrigerant charge verification.
This data becomes the system’s baseline performance record. If an issue arises in the future, this commissioning report gives your technician an accurate reference point to compare against. It also confirms that the manufacturer’s warranty is fully in effect—many warranties require documented commissioning to remain valid.
Many HVAC contractors skip this step entirely. They turn the system on, confirm cold air is coming out of the vents, and call it done. That approach is a gamble with your investment, your comfort, and your warranty coverage.
Step 13: Final Walkthrough and System Orientation
Before leaving, the installation team conducts a full cleanup of all work areas. Floor protection is rolled up, debris is removed, and all areas are restored to the condition in which they were found. Old equipment, packaging materials, and installation debris are hauled away.
The lead technician then walks you through your new system. This includes a review of how to change your air filter and recommended replacement intervals, how to use any new smart thermostat or programmable features, what routine annual maintenance looks like and why it matters, warranty coverage details and how to register your equipment, and Doug’s service plan options for ongoing maintenance.
You’ll receive a complete startup report documenting the system model, serial number, refrigerant charge, and all commissioning measurements. This documentation is your record that the installation was done correctly.
What to Expect After Your New AC Is Installed
A properly installed system delivers improved comfort and efficiency from day one. It’s normal for a new high-efficiency unit to run in longer cycles than an older system—modern equipment is designed to run at lower speeds for longer periods to maximize dehumidification and comfort. If you notice unusual sounds, water around the indoor unit, or rooms that aren’t cooling, contact Doug’s right away.
Annual maintenance before each cooling season keeps your system running efficiently, extends equipment life, and preserves your warranty. Many homeowners schedule their AC tune-up in March or April before South Louisiana’s heat arrives in full force.
Frequently Asked Questions About AC Installation
We understand that a full AC replacement comes with a lot of moving parts. Before our crew arrives at your door, look through these quick answers to common homeowner questions regarding ductwork, electrical needs, and what to expect on the day of your installation.
Quick Answers to Your Top Questions:
How long does an AC installation take?
Most standard installations are completed in one to two days. Jobs involving ductwork modifications, electrical panel upgrades, or challenging access situations may take longer.
Will the installation be disruptive or messy?
The crew lays down floor protection throughout all work areas and manages dust and debris throughout the process. You can expect noise during the installation. Most homeowners find it easiest to plan to be out of the house or to work from another area of the home during the day.
What if my ductwork is old or damaged?
The technician evaluates your ductwork during the initial assessment. If duct sealing or duct cleaning is needed, it can typically be completed as part of the same installation visit to maximize the efficiency of your new system.
Do I need to replace my thermostat?
Not always. If your current thermostat is compatible with the new system, it can often be kept. However, many homeowners use this opportunity to upgrade to a smart or programmable thermostat, which improves comfort control and energy management.
Can I finance a new AC system?
Yes. Doug’s offers financing options starting at $136 per month, making it more accessible to upgrade from an aging or failing system without a large upfront investment.
What maintenance does a new system need?
Annual maintenance—ideally before summer—keeps your system running efficiently, extends equipment life, and preserves your warranty. Changing your air filter every one to three months is the most important thing you can do between professional visits.
What if my electrical panel can’t handle the new system?
If your panel requires an upgrade, Doug’s licensed electricians handle that work as part of the installation process.
Ready to Schedule Your AC Installation in South Louisiana?
If you’re ready to move forward with a new air conditioning installation, Doug’s Service Company is here to help. We’re licensed, experienced, and committed to doing the job right the first time—from the initial assessment through final commissioning.
Call us at (985) 746-1116 or book online at calldougs.com to schedule your free in-home assessment. We serve Houma, Thibodaux, Raceland, Lockport, and throughout Lafourche, Terrebonne, Ascension, Assumption, and St. Mary Parish.

